
NC Series Operation
No matter if you have covered thousands of acres with your Newton Crouch spreader or its your first time operating a fertilizer spreader, we have easy instructions on how to get you spreading. Most importantly, Newton Crouch wants to stress that you follow proper safety technics. Remember that a fully loaded spreader buggy will drive differently than empty. Familiarize yourself with operating your spreader properly under different load, speed, and field conditions.
General Safety
- Read and understand the Power Unit manual and the Newton Crouch Co. Operator’s Manual and all safety labels before operating, maintaining or adjusting the spreader or power unit.
- Only trained and competent persons should operate the spreader. An untrained operator is not qualified to operate the equipment.
- Familiarize yourself with the safety devices on your power unit (truck/tractor).
Clothing:
- Wear protective clothing and substantial shoes. Do not wear loose or torn clothing. Rings are not recommended.
- Wear personal protective equipment. Ear protection and safety glasses may be required.
- Certain materials may require specific safety equipment to ensure safe handling. It is the operator’s responsibility to know and recognize these hazards.
Power Unit – (truck, tractor, etc.)
- Always wear the seat belt when the power unit is moving.
- WARNING: Be sure all power sources are off before working on your spreader. Be sure the engine is off and all moving parts are stopped.
- DANGER: Make sure that the power unit brakes are operating properly and capable of stopping the unit and the loaded spreader.
- DANGER: Remember that the stopping and braking distances vary with the load and vehicle speed. Familiarize yourself with the characteristics of your spreader under different load and speed conditions.
- DANGER: Never exceed the gross vehicle weight (GVW) of the Power Unit. It is the responsibility of the user/owner to insure that the Power Unit will meet the GVW requirements. Never exceed the capacity of the tires and axles on the Power Unit or spreader.
- Read all instructions and be completely familiar with controls before operating the power unit. Call Newton Crouch Co. if you do not understand any function.
- Always disconnect battery before welding.
- WARNING: Be sure lights and all electrical controls are working properly before operating. Lights are a Newton Crouch Co. option on pull type spreaders.
Spreader
- Do not modify or add to the spreader. Alteration of your spreader voids all warranties.
- Inspect before operating for wear, deformation, damaged, or missing parts and replace or repair before operating. Check lubrication in wheel bearings before using.
- When you receive your new spreader, all fasteners and hydraulic lines must be checked and secured before operation.
- DANGER: Never ride on or in a moving spreader.
- Do not transport spreader with drive wheel engaged.
- Never back up with drive wheel engaged.
- Keep tires at the pressure in pounds per square inch (psi) recommended by the manufacturer as indicated on the side of the tire. Do not exceed the recommended (psi) rating, speed rating, or load rating as found on tire. Call Newton Crouch Co. with any questions.
- DANGER: Check daily – wheel lugs and nuts, welds, hitch, hitch bolts at clevis (3), and hitch pin. Replace as needed. Change clevis hitch bolts every six months.
- WARNING: Keep your load as balanced as possible. An unbalanced load can cause your spreader to tip over in curves or inclines.
- DANGER: Do not disconnect spreader unless it has proper tongue balance, and on flat surface with no bystander under the spreader. An unbalanced load may cause spreader to fall on rear and will cause injury or damage. After checking balance, always check the tongue jack and block wheels to secure. Disconnect the spreader and store properly.
- When cleaning or servicing your spreader, use caution – surfaces are slippery when wet.
- Do not come in contact with metal edges.
- DANGER: There is no backup alarm provided on the spreader. Be sure not to have any bystanders in area when backing due to blind spots.
- DANGER: Rotating Spinners. To prevent serious injury or death from rotating spinners:
- Stop power source.
- Ensure bystanders are at least 100 feet away from spreader.
- WARNING: Avoid coming in contact with stop, pinch points, or pressure areas when operating manual engage handle. Also, never engage when bystander is in the operating area of the stop, pinch points, or pressure areas.
Rope Pull
- Warning – Rope pull must stay free from PTO shaft Work Area
Work Area & Terrain
- Clear the area of bystanders and do not engage power source when people are within 100 feet of the spreader when operating. Do not allow children to play on or around the spreader.
- Clear the operator’s area of foreign material. Make sure the spreader is free of grease or other materials that could cause slips and/or falls.
- Be familiar with the area where you will be using the spreader. Know the clearances required for the spreader in the work area, both side and overhead clearances. Watch for holes, rocks, and hidden hazards.
Safe Driving Practices
WARNING: Spreader is for field use only and may not meet required laws for transport on public roads
- Surge brakes and lights are Newton Crouch Co. options. These options are installed only at the request of the customer. It is the customer’s responsibility to know their local requirements.
- Check local laws for all highway brakes, lighting, and marking requirements.
- Drive at a safe speed relative to the local conditions. Ensure that your speed is low enough for an emergency stop.
- Reduce speed prior to turns to reduce the risk of overturning.
- Do not operate on steep slopes. Operate up and down – not across – intermediate slopes. Avoid sudden starts and stops as spreader can turn over.
Always use caution when working with a PTO. Familiarize yourself with PTO safety before operating a NC Series spreader with PTO. Secure loose clothing and hair. Never step over a PTO shaft. Watch this video by University of Minnesota about PTO safety.
PTO Safety Checklist:
- Ensure all PTO’s shields and guards are in place
- Before leaving tractor seat, disengage tractor
- Secure loose clothing, long hair, beards, shoe laces, belts
- Never step over PTO shaft
- Check for wear or cracks in PTO. Repair any before use.
| PTO TO TRACTOR (540rpm) – End of PTO Shaft to Center of Drawbar pin=14” |
| PTO TO TRACTOR (1000rpm)–End of PTO Shaft to Center of Drawbar pin=16” |
Running PTO to operate NC Series Spreader:
- Tractor RPMs must be maintained at desired operation speed to get accurate spread pattern
How to engage your conveyor chain on a NC Series Fertilizer Spreader
- Conveyor drive is operated by lever near the left wheel of spreader.
- WARNING: Check conveyor chain for tension (2” – 3” above cross member) and free of all obstructions. Turn conveyor by hand or by towing the spreader to be sure it moves freely. While conveyor is breaking in, it will stretch 10 – 14 inches. Longer bodies may stretch more. Never allow conveyor to touch cross member of spreader. The operator must inspect the conveyor and adjust on each load. Always keep conveyor square to front side runner.
- CAUTION: Excessive conveyor chain can wrap the rear roller causing damage to the rear roller, rear roller bearing, push up the cover plate, break/bend the front roller and/or rip the conveyor chain.
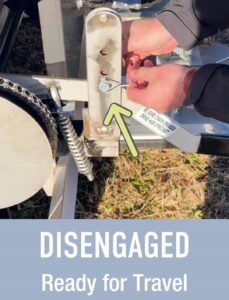
- Engage conveyor by raising drive wheel lever to top position.

NC Series Conveyor Engaged - Disengage by lowering drive wheel lever to bottom position.
NC Series Conveyor Disengaged - The bed chain is engaged when you want to spread. Never reverse a spreader when the bed chain is engaged.
- Practice turns and stopping prior to filling spreader with material.

Note that the NC Series is a GROUND DRIVE UNIT. It must be operated at the correct MPH (limited on ground drive units to 8 MPH maximum).
In order to apply the correct application rate to your field, you must know the following:
- Know your product density so you can use rate chart sticker
- Know the pounds per acre you want to spread
- Determine gate height for spreader using the NC Series Rate chart sticker on rear of spreader
- Set gate height to correct height
- Confirm that the correct sprocket – high vs low – is engaged
- Run tractor RPM to match the PTO on your spreader. NC Series spreader have two options of PTOs. Confirm that your spreader has a 540 rpm or 1000 rpm PTO shaft
- Keep your ground speed while spreading between 6 to 8 mph
The gate controls the amount of product, usually measured in lbs/acre that is being spread over the swath.
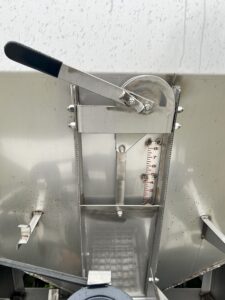
- The pointer located on the right side of the gate points to the scale.
- The scale and pointer must be correct to represent the actual distance from the conveyor floor (not the top of the chain) to the bottom of the gate. No lbs/acre can be correct if this measurement is incorrect.
- Move gate up and down using the gate handle.
- To move handle, loosen wing nut, move handle then tighten wing nut.
- Never set the gate below 1 ½ inches.
- Set the gate according to the rate chart for the corresponding pounds per acre.
There are two categories of NC Series pull type spreaders spinner engagement:
- Rope Pull: The spinners’ motions is engaged without a hydraulic cylinder.
- Hydraulic: The spinners’ motion is from a hydraulic source, either hydraulic power supplied by the tractor. Most NC Series hydraulic spreaders still requires a drive wheel to transmit power to the conveyor.
- Attach spreader to tractor using hitch pin.
- Ensure spreader PTO is locked into tractor. Always use PTO safety when using a spreader with a PTO.
- Ensure safety chains are in place
- Connect hydraulic fittings if spreader has hydraulic engagement
- Determine gate height for spreader using the NC Series Rate chart sticker on rear of spreader
- Set gate height to correct height
- Confirm that the correct sprocket – high vs low – is engaged
- Run tractor RPM to match the PTO on your spreader. NC Series spreader have two options of PTOs. Confirm that your spreader has a 540 rpm or 1000 rpm PTO shaft
- Keep your ground speed while spreading between 6 to 8 mph
Your spreader has a NC Series rate chart that is specific to its capacity and tire size on the rear panel of the hopper. Click the button to find copies of our NC Series fertilizer rate chart stickers. Our standard swath width for the NC series is 40 ft or 50 ft but other widths and rate charts are available. Please contact 770.227.1234 for more information.
Need Replacement Parts for your NC Series Spreader, visit our parts page
Model 48 NC Series Spreader Inspection
| Areas to Check | Yes | No |
|---|---|---|
| LEFT DISH ON CORRECTLY – standing at rear. Bolt holes to right of center line. Dish rotates clockwise. | ||
| RIGHT DISH ON CORRECTLY – standing at rear. Bolt holes to left of center line. Not marked | ||
| LEFT BLADE points to left at rear. Front side of blade aligns with rear opposite blade. Check all 6 blades – 3 straight across – every other one in rear hole. | ||
| RIGHT BLADE points to right at rear. Front side of blade aligns with rear opposite blade. Check all 6 blades – 3 straight across – every other one in rear hole. | ||
| BLADES bent on 90 degrees | ||
| DIMENSION center to center of dishes – 21 1/2” | ||
| DISHES level across both left and right | ||
| DISHES level front to back | ||
| DISHES – LEFT ROTATION is clockwise. Check in operation | ||
| DISHES – RIGHT ROTATION is counterclockwise. Check in operation | ||
| DISHES – RPM SPEED Set for swath & spread pattern. 50 ft. – with 8” pulley for 540 or 750 RPM. Set up with a 4.5” pulley for 1000 RPM. | ||
| CHUTE to back for testing of spread pattern | ||
| GATE opening scale matches actual measurement from floor. | ||
| GATE SETTING – Read setting at level position looking straight into scale | ||
| GATE HEIGHT – correctly indicated number by pointer to match actual measurements from floor to bottom of gate, do not set below 1 ½” | ||
| MOTOR MOUNT / BAFFLE in good condition | ||
| CONVEYOR PIN pulling against sprocket | ||
| REAR ROLLER BEARINGS – Check condition & height | ||
| REAR ROLLER COVER PLATE fits rear roller tightly | ||
| REAR ROLLER DRIVE in good condition | ||
| CONVEYOR Set for correct tension | ||
| CONVEYOR FRONT ROLLER Straight across | ||
| CONVEYOR TAKE UP ROD NUTS Locked in position | ||
| V-BELTS & CHAINS Tense and aligned | ||
| ALIGNMENT: Start at drive pulley (CW)- Go to underside of drive pulley straight into right spinner; pulley center line of drive center of right spinner. Follow through with each pulley. DO NOT attempt to align top of belt. Where the belt goes on is most important. | ||
| Pulley Placement – Right – Down on top of bearing | ||
| Pulley Placement – Left – 1 ¾” from platform to bottom of pulley | ||
| Drawbar should be 18” or adjust clevis to match bottom edge of the top clevis to top of draw bar | ||
| PTO TO TRACTOR (540rpm) – End of PTO Shaft to Center of Drawbar pin=14” | ||
| PTO TO TRACTOR (1000rpm)–End of PTO Shaft to Center of Drawbar pin=16” | ||
| ENGAGEMENT ARM disengage clutch dog, must clear tab – rotate to check | ||
| ENGAGEMENT ARM rope pull – dog of clutch catches ¼” under engagement arm, lifts off cluster | ||
| CLUSTER must be greased. Dog has spring tension to pull back into place – stop if broken off and do not use | ||
| DRIVE WHEEL ENGAGE LEVER – drop down and locks on sprocket. Be sure chain is off chain lift when engaged | ||
| DRIVE WHEEL ENGAGE LEVER – locks in position. Upper position (pin below handle in top hole) to spread fertilizer. Lower position (pin on top of handle in bottom hole) to transport spreader (disengage) | ||
| BEARINGS, SHEAVES, SPROCKETS All bolts and set screws tighten | ||
| HYDRAULIC HOSES Check for worn or damaged areas, replace as needed | ||
| HYDRAULIC LEAKS repair as needed | ||
| BOLTS in all areas tight | ||
| TIE DOWN BOLTS Check & retighten | ||
| DRIVE SHAFT Set screws tight; Grease fittings, drive wheel clutch on gear box | ||
| CLEAN spreader of build up | ||
| DRIVE BEARINGS & SHAFTS Aligned & tight | ||
| TIRES pressure at correct level | ||
| TRACTOR RPM’s – must be maintained at design operation speed – either 540 or 1000 RPM’s at the PTO while spreading | ||
| RATE CHART Matches sprockets and tire size on unit | ||
| FOR PROPER SWATH the revolutions per minute (RPM’s) must be maintained at design operation speed – either 540 or 1000 RPM at the PTO while spreading | ||
| SPECIFICS OF MATERIAL TO BE SPREAD – are known. Pounds per acre. Pounds per cubic foot, desire swath, quality of material | ||
| SELECT SPREAD PATTERN using valve on spreader | ||
| SAFETY ISSUES corrected as needed on spreader & chassis. 1.) Optional brakes checked and working. 2.) Optional safety chains in place | ||
| SAFETY PRECAUTIONS – read & know for rotating equipment hazard | ||
| GENERAL VISUAL CHECK Look for damaged or lost parts |
Need Replacement Parts for your NC Series Spreader, visit parts
Newton Crouch has an extensive video library full of sales or technical information. However, if you would like to see a new topic covered, send us a message.
Figure application rate
NC Series to Tractor
Engage COnveyor
Engage Spinners
At Newton Crouch, we know we build the best ag fertilizer spreader on the market and we want to prove it to you. Find a Newton Crouch dealer near you. Find your ideal fertilizer applicator at Newton Crouch: Fertilizer Spreader, PTO Spreader, PTO Fertilizer Spreader, agricultural equipment, agriculture spreader, Small Fertilizer Spreader, single axle spreader, commercial spreader, fertilizer spreader for coop, combo spreader, fertilizer-lime spreader, fert spreader, fertilizer applicator, fertilizer buggy, narrow fertilizer spreader, spreader for tight spaces, best ag spreader in Canada, best ag spreader, commercial spreader, best commercial spreader, pull behind spreader, pull behind buggy, fertilizer buggy, how to operate a fertilizer spreader, how to start spreader spinners, how to start spreader dishes, how to spread fertilizer with ag spreader, how to start conveyor on a spreader, how to operate a PTO spreader, how to operate a pull behind buggy, how to operate a fertilizer buggy, how to read a fertilizer rate chart, how to operate a Newton Crouch fertilizer spreader, how to use a NC Series spreader, wilmar spreader, wilmar fertilizer spreader