
Summer is here and we know that our customers are in the field. As you get your buggies out, Newton Crouch suggests preforming a spreader start up check and a spread pattern test. Doing both of these should help lessen any suprises when you are fully loaded with product and ready to operate your spreader.
Spreader Start-Up Check List
- Check all bolts and set screws
- Check hydraulic hoses for wear spots & leaks
- Check tie down bolts – must be tight and in good condition
- Check drive wheel for wear and if air filled, check air pressure
- Check the condition, placement & alignment of all blades
- Verify chute settings are correct
- Adjust chain idler as necessary
- Check all filters – return line, suction line
- Check hydraulic oil level
- Check conveyor tension on top and bottom of spreader
- Check all bearings – front roller, rear roller, jack shaft & drive wheel
As part of our Spring Checklist, we recommend a yearly spread pattern test. Spread pattern tests are a great way to ensure your machine is functioning at its best and that your product is getting where it needs to be. Our parts departments have spread pattern kits available.
Prepare for Spread Pattern Testing:
- Choose a flat, clean area with low grass. Area should have a 150-foot run total (50 before pans, 100 after pans). Ensure that spreader wheel path is free of bumps and potholes.
- Choose spreading direction. Run spreader into the wind. It is best to spread pattern test in low wind.
- Determine spreader ground speed. Ensure driver will maintain correct speed and will operate tractor/power unit at correct RPMs to produce sufficient oil flow to spreader. Do not change gears over test area.
- Check product. Uniform material in size and weight will test best. If product is lumpy, it will not test well.
- Fill Denisty Scale to top with product, then even off top. Do not pack the cup with material. Using the slide to level density cup, read the pounds per cubic foot. Using the rate chart that came with your spreader, adjust your spreader gate to match the correct product weight.
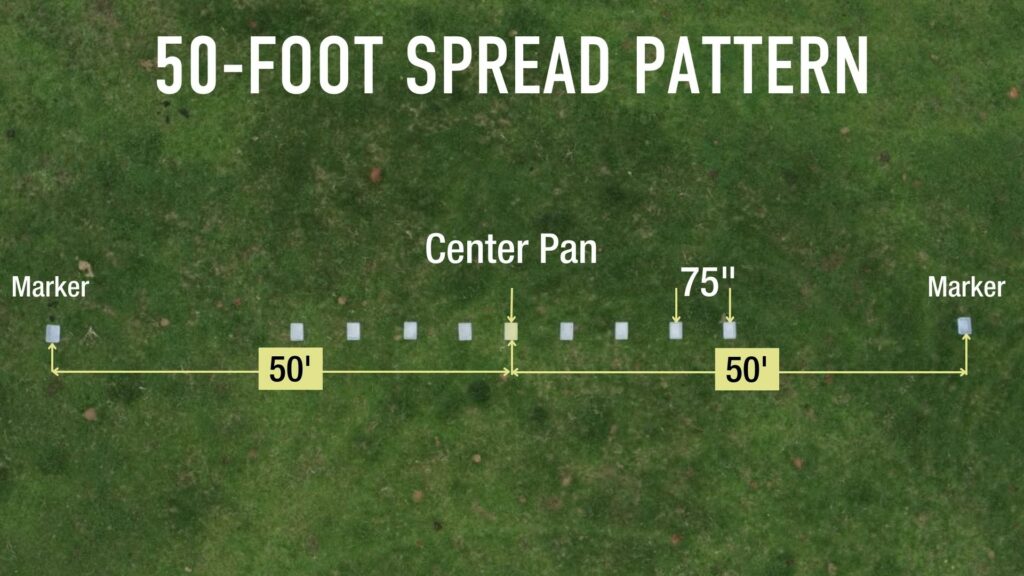
- Lay out eleven pans in straight line. The center pan should be identified with a color or flag to ensure that driver straddles the center pan. Space pans evenly. Measure distance for pans from center of pan to center of pan. See chart below for pan spacing.
- Place a marker or pan on right and left side of spread pattern to show where to begin and end. Place marker the swath distance from center pan. Example. Swath Width of 60-feet. Measaure 60-foot right of center, place marker. Measure 60-foot left of center pan, place marker.
- Starting at right or left side maker, drive over maker/pan at a consistent speed. Do not hit pan. Go 100-feet past pans, make a u-turn and straddle middle pan. Go 100-feet past pans, make a u-turn and straddle marker.
| Swath | Number of Pans | Distance from Pan Center to Pan Center |
|---|---|---|
| 60-foot | 11 | 72-inches |
| 50-foot | 9 | 75-inches |
| 45-foot | 9 | 67.5-inches |
| 40-foot | 9 | 60-inches |
- Carefully collect material from pans and pour each pan onto a tube from left to right on the stand. (pan 1 = far left, pan 5 = center, pan 9 = far right). Newton Crouch targets less than 10% variation between test tubes.
General Suggestions to Improve Spread Pattern
- Increasing Spinner Speed RPM will take material from center of spread pattern and move it to outside of spread pattern.
- When Chute is moved to the rear of the spreader, material is taken from the center of spread pattern and moved to the outside of the spread pattern.
Here is a video on the simple steps to ensure you have the most accurate spread pattern possible.